
Region: Cadian Subsector.
Date: 999.M41
Death Guard vs Astra Militarum.
2000 points.
Mission: Prepared Assault.
Having learnt that the Cadian defenders were about to receive reinforcements through the valleys of the Draken Mountains, Typhus directed one of his lieutenants to halt their advance. The plan was to ambush them in the ruins of an old garrison outpost. What the mighty champions of Nurgle had not expected was a full armoured company of tanks rolling towards them. Both sides had prepared for a potential engagement however. Being the oncoming tanks was a detachment of basilisk artillery pieces and behind the Death Guard sat a company of Iron Warriors tanks. Battle was soon joined!
Ashleigh challenged me to a game a few weeks back, seeking another scenario from the Battle Missions book. His choice was Prepared Assault. I don't get to fight the Astra Militarum very often so I agreed happily. At 2000 points I knew that I needed to field the big Chaos Knight just in case I could stomp through the tanks and transports. I half expected a Baneblade or other super heavy tank but instead he fielded a massive force of tanks with only a couple chimera bearing troops. This was going to be tough.
The mission has three objectives in my deployment zone. Two centrally located and the third placed by my opponent who stuck it almost on the dividing line between us and on my weakest flank (we deploy before he places his objective). Basically I have to hold him off and win by controlling more objectives than him. With nothing being allowed in reserve, no Heldrakes these game - not that they would have done much - and no Valkyries thankfully.
Ashleigh had the first turn and barely moved his tanks forward. I suffered a hell of a lot of shoots but barely lost anything, a couple chaos marines and my Predator tank only. My Knight moved forward and took out a tank with a nice shot. Most of his army was out of range so I had to just sit there or move units into a better position. As the game progressed my Knight was able to get into his tank line and proved useless. Rolled a 1 on my impact hit, rolled two 1's on my rolling to damage with the D strength chainsword and then rolled 1's on my stomp. My luck had gone out the window and the Knight now sat in the middle of a lot of enemy firepower.
My opponent charged out with his Culexus Assassins but the shoot slew but a single chaos marine. I charged it with my Raptors and over two turns it wiped the Raptors out and only took one wound. He would fall eventually but it took a reaper autocannon to do it.
I started to rapidly loose marines holding the two main objectives. Eventually I was forced to hold one with my terminators but most of that squad died to ratling snipers. I did make a lot of feel no pain rolls but not enough to prevent the squad being whittled away.
The Knight soon stomped over a couple tanks but then died to the massed firepower into his back. I just could not make the 5+ invulnerable save. Unfortunately when it toppled it didn't land on anything of my opponent's which was a shame. Even the explosion failed to do anything.
I soon had to make a decision and I had to split my forces to try and push for a draw. Unfortunately I could not bring down the two tanks that had moved into my objectives. On the last turn one became a wreck but his troops jumped out and contested them. The game ended with Ashleigh's forces holding two of the three and contesting the third.
An interesting thing about this mission is the rules for the bombardment. The AM player gets two small bits of paper and the opponent gets one. During the shooting phase they can be dropped from 36'' and where they land it triggers a Str 8 AP 3 ordance barrage last blast. Rather random but fair enough. The first of Ashleigh's bombardment fluttered off the table and missed. Our remaining ones simply deviated into open ground and did nothing.
I should have expected a full on tank assault but even if I had, I don't have anything that could have taken them out at range. My meltaguns are more up close and personal. Although I needed the Knight, it could have done without rolling all those 1's.

Stomp the tank!

The forces arrayed against me.

Imperial tanks move into position.

My chaos lord attempts to melta bomb the chimera but fails twice!

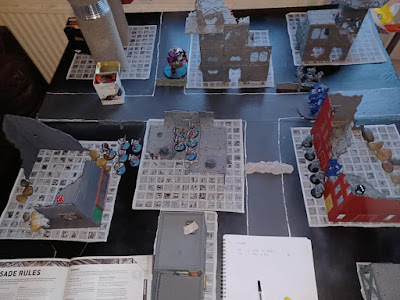
Starting deployment.


No comments:
Post a Comment